Culling is the process of finding the “keepers” and discarding the undeliverable images in your Lightroom catalog. With the massive amount of images we capture today, culling can be the most time-consuming part of your workflow. Luckily, by using a modern AI Hybrid Workflow, you can cut your culling time in half and get straight to the creative editing process.
Our Recommended Workflow: The “Culling In” Hybrid Method
After testing multiple methods and culling hundreds of thousands of images, we’ve perfected a workflow that balances speed with artistic control. We call this a “Culling In” workflow. In this system, every image is considered a reject by default unless it earns a “Flag.”

We use AI Assisted Culling (in Lightroom) or a 3rd party culling software (such as Impossible Things or Aftershoot) to handle the heavy lifting, but we don’t depend on it blindly. The secret is to use a color-coded system that allows you to visualize the AI’s suggestions at a glance, making it easy to confirm the keepers and rescue any creative shots the AI might have misunderstood.
To do this, we recommend the following system:
- Flag (P): Selection / Keeper
- Unflag: Rejected
- Green Color (6): AI Selected (High Score)
- Red Color (7): AI Rejected (Low Score)
Step 1: Understand AI’s Limitations
The first step in a successful workflow is understanding exactly what AI can and cannot do. Generally, Lightroom’s AI (as well as third party culling software like Impossible Things, Aftershoot, and Narrative) is highly accurate with traditional portraits such as headshots, studio sessions, or formal family photos where the subject is looking directly into the lens. In these scenarios, the AI is excellent at pinpointing tack-sharp eyes and neutral expressions.
However, AI begins to struggle when your photography becomes stylistic or candid. Because the algorithm is programmed to seek “perfection,” it may incorrectly flag the following as “low-quality”:
- Intentional Misfocus: A shot where you’ve intentionally focused on a bride’s bouquet or a ring, leaving the face artistically blurred.
- Creative Motion: Panning shots or “dreamy” motion blur that conveys movement and energy.
- Extreme Compositions: A “rule-breaking” shot where the subject is in the far corner of the frame or heavily obscured by foreground elements (like shooting through leaves).
- Candid Profiles: AI thrives on “face-on” detection. In candid moments where subjects are looking away, laughing hysterically, or captured in profile, the AI might fail to recognize the “eyes” and give the image a lower score than it deserves.
Key Takeaways:
- Trust AI more for your traditional portraits like headshots, family formals, and “look-at-the-camera” shots.
- Pay closer attention to your artistic and candid photos, as the AI may not recognize your creative intent.
Step 2: Run the AI Analysis
Navigate to Library > Assisted Culling. This AI tool analyzes your images for focus, blinks, and exposure. We recommend a conservative setup:
Select
- Subject Focus – 60
- Eye Focus – 60
- Eyes Open – Unchecked
Rejects
- Documents and Receipts – Checked
- Misfires – Checked
- Exposure Issues – Checked
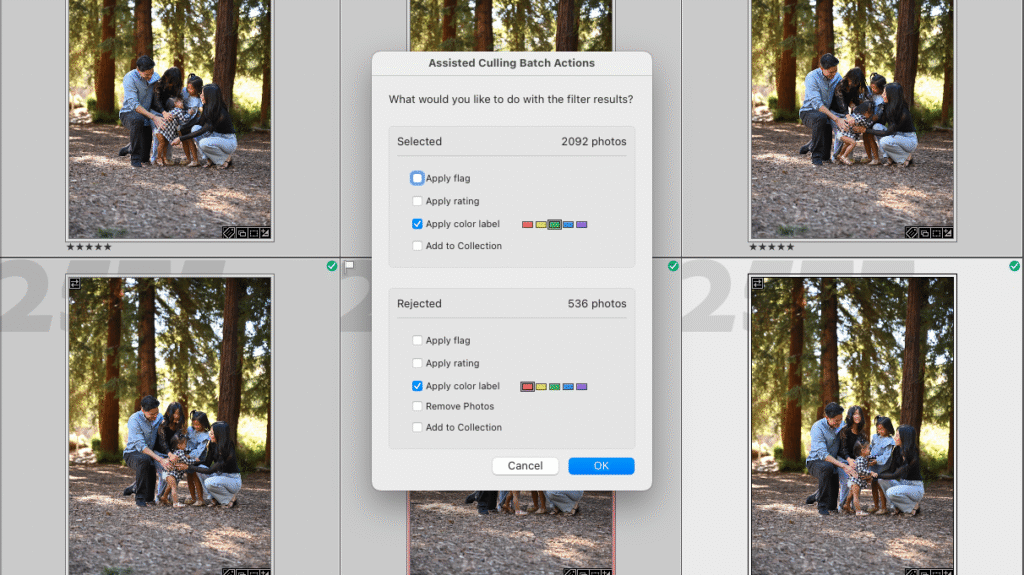
Once the AI has analyzed your images for focus and blinks, use the “Assisted Culling Batch Actions” to bulk-assign colors: set the AI’s selections to Green and the Rejected to Red.
Step 3: The “Green Pass” (Culling In)
Filter your catalog to show only the Green labels. Switch to Loupe View (shortcut: E) and turn on Auto Advance.

Rapidly move through these AI-selected shots and hit “P” to flag your favorites. Because the AI has already verified the technical quality, this pass should be quick. Focus on emotion, composition, and storytelling rather than checking for sharpness.

Step 4: The “Red Review” (The Safety Net)
Switch your filter to the Red labels. Perform a high-level review of these “AI rejects.” Scan for any artistic “hero” shots like a dreamy, soft-focus candid or intentionally blurred photos that the AI may have incorrectly flagged. If you find one, simply press “P” to flag it as a keeper.
Step 5: Batch “Reject” The Remaining
Once you’ve flagged your favorites from both the Green and Red piles, go to the Library Filter, click Attribute, and select the “unpicked” flag.

Press CTRL+A (Windows) or CMD+A (Mac) to select everything you didn’t flag, then press “X” to mark them as rejects.
Traditional Culling Methods
While the Hybrid Method is the fastest, you may be familiar with these traditional culling techniques. Here is why we generally move away from them for high-volume shooting.
The Star Rating System (0-5)

The star system often slows photographers down because it requires too much micro-decision-making (e.g., “is this a 3 or a 4?”). We recommend using stars ONLY AFTER you’ve finished culling to identify your top portfolio-worthy shots.
Manual Flagging (P/X) Only

Using “P” for Pick and “X” for Reject is the foundation of our method, but doing it entirely manually is no longer necessary. By skipping the AI Assisted Culling step, you are forced to zoom in and check focus on every shot, a task that a computer can now handle for you.
Conclusion
The secret to a fast workflow is making fewer decisions. By letting AI handle the technical pass and using the “Culling In” method for your artistic picks, you keep the process short and sweet. If you work presets into your workflow, you can trim even more time off of the whole post-production process.