What is a histogram? For photographers of all types, understanding your histogram is a crucial aspect of getting the best image quality from your camera. If you don’t understand histograms, you’re going to be frustrated when your images turn out too bright or too dark, or just don’t seem to have a good level of contrast and detail.
However, if you do understand a histogram, you can easily create beautiful images that take full advantage of your camera’s image sensor. You’ll be able to expand your creative potential to include the most difficult lighting conditions, without being afraid of pictures turning out unexpectedly bad.
In this article, we’ll explain how to “read” or understand a histogram, how to use it both in the field and in Lightroom, and reveal the most common histogram mistake that prevents clean edits.
How To Read A Histogram

At first glance, a histogram may appear to be a very technical, un-creative thing that you’d try to avoid, especially as an artistic, creative person. But to be a competent, skilled digital photographer, it’s important to have a basic understanding of what you’re looking at.
Don’t worry, it’s quite simple. Once you realize what you’re looking at, it will become second nature in no time.

Here’s the technical stuff in a nutshell: A histogram is a graph of your image data. From left to right, it charts your image’s tones from black to white. The height of the graph at any point shows how many pixels exist at that brightness level. A “spike” or bump on the graph means that a significant part of your image has tone in that range.
So, if there is a spike or bump on the histogram’s left side, that means there are a lot of shadows. If there’s a bump on the right side, that means there are a lot of highlights.
That’s basically it. The best way to learn more and expand on this basic understanding is to look at a bunch of your own images and see if you can recognize the various bumps of the histogram and which parts of your image they correspond to.
There Is No “Perfect” Histogram Shape
One of the biggest misconceptions about histograms is that there’s an ideal shape you should aim for. This isn’t true. Different scenes produce different histogram shapes, and that’s completely normal.
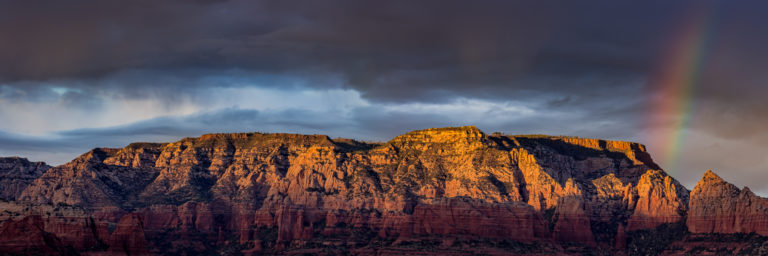
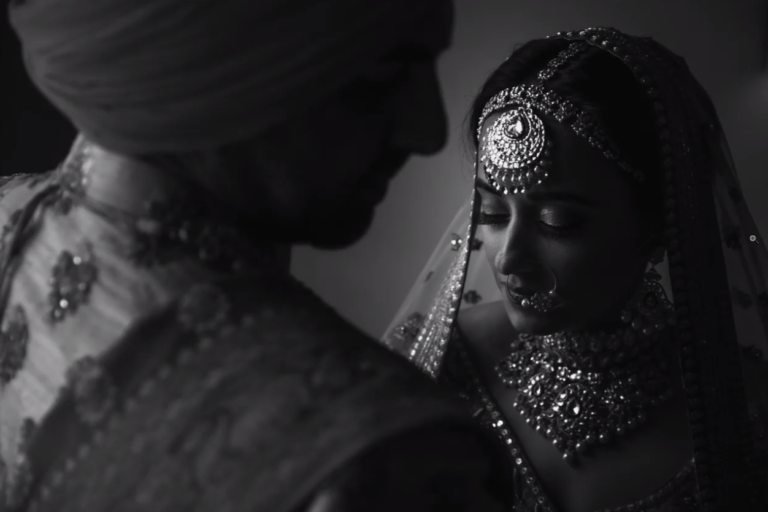
A photo of a bride in a white dress against a bright window will naturally have a right-heavy histogram. A groom in a dark suit in a dimly lit room will show a left-heavy histogram. Neither is “wrong.” The only actionable questions are: Are you clipping tones you care about? And are you forcing yourself into heavy shadow or highlight recovery later?


If you’re ready to dive in deeper and understand more about the technical aspects of histograms, you can start looking at RGB histograms and apply the same understanding of light and dark tones to light and dark colors.
Why Is A Raw Histogram Different In Camera Versus In Lightroom?
Before we go any further, there’s an important caveat: The histogram you see on the back of your camera is not going to be identical to the histogram you see in Lightroom. This matters more than most photographers realize.


Why? Your camera is actually showing you a histogram based on a JPG image that is processed in-camera to represent the raw file. Yes, even if you shoot RAW and not RAW+JPG, you are still seeing a histogram from a JPG thumbnail of that raw file. The same applies to your highlight and shadow clipping warnings (the “blinkies”).
Lightroom, on the other hand, shows you a histogram based on its own interpretation of that raw data. It’s still not directly a histogram of the raw data itself, but a representation of the processing you have applied to that raw data.
This is why your images often look vibrant and contrasty on the back of the camera, yet appear more dull and flat in Lightroom. Every raw image’s histogram will reflect this difference. More importantly, those “clipping” warnings can be conservative or inconsistent depending on your picture style, contrast settings, and white balance. Use the histogram and alerts as guidance, but don’t ride the edge blindly based on in-camera warnings alone.
If this bothers you, you can minimize the difference by adjusting your in-camera processing to look more similar to how the raw file will appear in Lightroom. Look for your camera’s image processing settings, often called “Picture Style,” “Picture Control,” or “Creative Style.” Changing these settings won’t affect the actual raw image data, just the back-of-the-camera preview and its histogram.
Try switching this setting from “Standard” to “Neutral/Natural” for a slightly less processed look. There is also a “Contrast” slider within those style control settings, and you can turn that down for even flatter, more neutral-looking images.
Just remember that if you do shoot JPG, or if you shoot any video, these settings WILL be applied to those files.
The Most Common Histogram Mistake That Prevents Clean Edits
Before we dive into exposure techniques, let’s address the mistake that causes the majority of “dirty” or “muddy” looking edits. If you’ve ever struggled with noisy shadows, grayish skin tones, weak color separation, or presets that feel inconsistent, this is likely the culprit.
The mistake: Underexposing to “protect highlights,” then lifting shadows aggressively in post-production.
This happens when photographers fear clipping highlights so much that they underexpose the entire frame. Later in Lightroom, they push the Shadows slider to +40, +60, or even +80 to recover detail. The result? Muddy shadows, amplified noise, color contamination, and an overall “unclean” look that no preset can fix.
Why does this happen? When you underexpose, you’re starving your shadows of signal (photons). The signal-to-noise ratio in those dark tones is poor, and when you amplify them in post, you’re amplifying all that noise and color contamination along with the detail you want.
The fix isn’t complicated: Expose for what must be clean (usually your subject and midtones), protect important highlights, and avoid “shadow starvation.” When the scene’s dynamic range is too extreme, change your solution (add light, move, bracket, or accept losing a non-critical highlight). Don’t just underexpose everything and hope to fix it later.
How To Use A Histogram To Get Better Photos

Now that we understand histograms and the most common mistake, how do we use this information to get better photos? The core principle is simple: Avoid clipping tones you care about, and don’t force yourself into heavy recovery work later.
If the image data graph touches or spikes at the edges of the histogram, that means you’re losing image data. But not all clipping is equal. A small specular highlight on a window or light fixture? Probably fine to clip. The texture on a wedding dress or detail in skin highlights? You’ll want to preserve those.

You already know what looks good to your eye. Use your histogram as an aide in determining which highlights and/or shadows might be at risk of being “clipped,” or lost, then make intentional decisions about what to prioritize.
Preserving Highlights With A Histogram
Using your histogram, you can “save” your highlights by making sure that the graph doesn’t slam into the RIGHT edge of your histogram. If all the highlights in your image are important to you, then you want the histogram data to just barely approach or touch the right edge. If you see it hit the edge, and especially if you see it begin to spike at that edge, then your exposure is too bright and you need to darken it a little bit.
However, keep in mind that modern RAW processors can often recover 1-2 stops of highlight detail that appears “clipped” on the in-camera histogram. This varies by camera sensor and generation, so it’s worth testing your specific camera to learn its limits.
Preserving Shadows With A Histogram
The same technique applies to your shadows: You can save your shadows by choosing an exposure that doesn’t slam the histogram data against the LEFT edge. Especially if your subject is a mid-toned or darker subject, you’ll want to choose an exposure that just barely touches the left edge, with no spike.
This is often more critical than highlight preservation because severely underexposed shadows that you try to recover in post will show significantly more noise and color issues. The signal-to-noise ratio in the shadow portion of your histogram is inherently weaker, so protecting shadow data is essential for clean edits.
Using Your Histogram For Maximum Dynamic Range
What if your scene has too much contrast (dynamic range) and it bumps into both edges of the histogram? This is a situation that happens often in harsh or dramatic light, and your histogram can be the most helpful here.
ETTR: Expose To The Right

If you’ve heard about histograms before, you’ve probably heard the phrase “expose to the right,” or ETTR. This refers to your histogram and making sure that your highlights are perfectly exposed at the right edge of the graph.
In other words, ETTR means: Ignore the shadows, choose your exposure by paying attention to the single brightest important highlight in the scene, and put that highlight precisely at the right-hand edge of the histogram, letting the rest of your image data fall wherever it may.
This is a simple concept, and while it won’t always guarantee that your darkest shadows will be saved, it will ensure that as much of your scene as possible is captured with the best overall image quality. The reason? More exposure (without important highlight clipping) produces cleaner files with less noise, because you’ve captured more light (signal) relative to the inherent sensor noise.
If your scene doesn’t have much contrast and it easily fits within your histogram, ETTR is still a good idea. The left (shadow) half of your histogram does not have as good image quality as your right (highlight) half. If you severely under-expose your image in-camera, you will see a lot more noise in all of the tones when you brighten the image in Lightroom.
When To Prioritize Shadows Over Highlights

Sometimes your shadows and mid-tones are more important than your brightest highlights. In these situations, you’ll want to expose so that the left-hand edge of your histogram (shadows) has the data it needs, even if that means losing some highlights.
In portraiture, this happens frequently. You shouldn’t base your entire exposure around a bright background or specular highlight that’s unimportant, while risking poor image quality (noisy details, unsaturated colors) on your subject. Instead, use your histogram to correctly expose your subject, even if there are faces in shadow that require you to blow out a small part of the background highlights.
The key question to ask: What tones in this image must look clean? Expose for those. If it’s skin and midtones (most portrait situations), protect that data. If it’s a bright subject against a dark background (product photography, certain creative shots), protect the highlights.
Why This Matters More Than Technique Labels

Rather than memorizing exposure technique acronyms, focus on this principle: Expose to preserve the data you need. This isn’t “expose to the right at all costs,” and it’s not “let highlights blow to save shadows.” It’s making intentional decisions based on what must look clean in your final image.
When truly clipped, highlights are often unrecoverable (once a color channel saturates, that data is gone). But severely underexposed shadows, while technically recoverable, will show significant noise and color degradation. Neither extreme serves your images well.

The practical reality: Modern camera sensors (especially recent Sony, Canon, and Nikon bodies) have excellent dynamic range and shadow recovery capabilities. However, this varies significantly by camera generation and brand. Test your specific camera to understand its limits rather than relying on general rules.
Histogram Strategies For Common Shooting Scenarios
Let’s apply these concepts to situations you’ll encounter regularly.
Backlit Portraits (Sky Behind Subject)
The common mistake: Underexposing the subject to save the sky, then lifting shadows heavily in post.
The better approach: Expose for your subject’s skin and midtones. Then solve the sky problem with your technique: change your angle, find open shade, add flash or a reflector, or accept that you’ll need a second exposure for the sky if both are critical. Don’t sacrifice your subject to save a background.
Indoor Window Light
The common mistake: Trusting the bright LCD preview, then finding the file is actually dark with shadows you need to lift aggressively.
The better approach: Expose to keep midtones healthy and protect skin highlights. Check your histogram rather than trusting the LCD (especially if your LCD brightness is set to auto). Keep the left edge of your histogram off the wall if you want clean, usable shadow detail.
Reception and Low Light
The common mistake: Pushing ISO high while still underexposing, then trying to recover shadows in post.
The better approach: Expose properly for your subject and accept a darker background. The histogram will often be left-heavy in low light, and that’s okay. Just avoid clipping shadows if you want clean blacks later. Consider using bounce flash or a small LED to keep shadows cleaner rather than relying entirely on ambient light.
Quick Field Workflow: 10-Second Histogram Check
Here’s a practical workflow you can use on any shoot:
Step 1: Meter for your subject (or the area that must be clean).
Step 2: Check your highlight alert or histogram for important highlight clipping.
Step 3: If important highlights clip, adjust exposure or add light. Don’t just crush the whole frame.
Step 4: If nothing important clips, bias brighter rather than darker, especially for scenes where you need clean shadows.
Step 5: Lock it in and shoot the moment.
Camera Setup For Trustworthy Histogram Feedback
To make your in-camera histogram more useful:
Set LCD brightness manually. Auto-brightness adjusts based on ambient light, making your preview unreliable. Pick a consistent setting and learn how your files look relative to that preview.
Turn on highlight alert. The “blinkies” that flash on blown highlights are a quick visual check that doesn’t require studying the histogram for every shot.
Use a flatter picture style. As mentioned earlier, switching to “Neutral” or “Natural” picture styles gives you a more accurate preview of what your raw file actually contains.
Using Your Histogram In Lightroom

You’ve captured your images and got a histogram that looks good for your type of subject. Is that it? Actually, histograms can be helpful in post-production too.
In Lightroom, your histogram can guide you in the right direction when editing your images. It appears in the upper-right corner of both the Library Module and the Develop Module. Click on the Histogram tab to show or hide it.
Here’s a diagnostic tip: If you find yourself constantly lifting shadows past +40 to +60, your captures are probably underexposed. You’re paying for exposure decisions in post-production time and image quality. Look at the histogram of your problem files and you’ll likely see data pushed hard against the left edge.

One of the best, most powerful ways to utilize your histogram is with the Tone Curve tab in the Develop Module. Lightroom overlays a histogram on your curve line, so you can adjust specific tones easily and even use the “dropper” tool to pinpoint multiple specific tones to adjust.
Quick Checklist For Clean Histogram Habits
Use this checklist on your next shoot:
- I expose for what must be clean (usually subject and skin)
- I protect important highlights, but I don’t underexpose the whole frame to save the sky
- I avoid heavy shadow recovery as a default approach
- If dynamic range is too high, I add light, move, bracket, or choose what to sacrifice
- My LCD brightness is set manually
- My highlight alert is turned on
- I use a flatter picture profile for more accurate previews
Conclusion
Now you know how to read and use your histogram. More importantly, you understand the most common mistake that leads to muddy, noisy edits: underexposing to protect highlights, then fighting to recover shadows in post.
The histogram isn’t about following rules or hitting a “perfect” shape. It’s about making intentional exposure decisions based on what must look clean in your final image. Expose to preserve the data you need. Protect important highlights. Avoid shadow starvation. And when dynamic range is too extreme, change your solution rather than just underexposing everything.
Whether you’re shooting landscapes and want maximum highlight detail, or photographing portraits where clean skin tones matter most, your histogram gives you the information you need to get it right in camera. Use it wisely, and you’ll spend less time fighting your files in Lightroom and more time creating images you’re proud of.